Collar rig with joints and cMuscleKeepOut nodes

Hi guys, almost a month ago I posted this rig test for a collsion setup I made for a character I was working on.

The rig is joints based, therefore would be suitable for game animations. I couldn't use the same asset but I created another one for the purposes of this tutorial. 

A basic knowledge of maya and rigging in is required. This is not a rigging and rigging practices tutorial, it is made specifically to cover the technique of using cMuscleKeepOut nodes in Maya. So feel free to take it and conform it to whatever practices and naming conventions you normally use in your rigging process.

I will break this post into 3 main sections. The curve setup, the collision setup and the joints setup. But before we proceed this is how the rig should look like in the end.


You can purchase the work files for $5 on Gumroad


Kiel Figgins kindly pointed out that the MayaMuscle plugin is not loaded by default in some cases so make sure you load the MayaMuscle.mll plugin in the Plug-in Manager.

Loading the MayaMuscle plugin.


The Curve Setup

1 - Create a nurbs circle with 8 spans and name it "collar_crv". 

Creating a nurbs Curve.

Nurbs Circle options

2 - Shape the curve along th einside o the collar. The curve vertices are the points of contact with our collision mesh so make sure they are placed where you would want the collision to happen.

Curve placement. The head is hidden for clarity purposes.

3 - Create a cluster for every vertix of the "collar_crv". In the riggging tab go to Deform>Cluster. 

Creating clusters

4 - We need an offset group for each cluster. Press CTRL+G the short cut for creating an empty group. Then select the group and the cluster and go to Modify>Match Transformations>Match All Transforms. Now the group is snapped to the cluster, you can parent the cluster to the group by selecting the clusterHandle and the group and press P or go to Edit>parent.


The Collision Setup

5 - Now we create our collision mesh. Most of the time I use Polygon primitives as collision shapes like a cylinder or a sphere, but in this case I will use a static duplicate of the head mesh and delete the faces I don't need to collide with the curve. Then parent the collision mesh to the neck driver. For demonstration I just parented it under the joint directly.

I chose in this case to use a duplicate of the head because his chin is quite prominant and it would be nice to have it collide against the collar.

6 - The last step for creatig our collision mesh is to selet the collision_head and go to Rigging>Deform>Muscle>Muscles/Bones>Convert Surface to Muscle/Bone.

7 - Select all the cluster handles groups and go to Rigging>Deform>Muscle>Self/Multi Collsion>Rig selection for KeepOut

8 - If you expand the cluster groups in the outliner you will see two transforms created on top of the cluster handles. The cMuscleKeepOut and the cMuscleKeepOutDriven groups. The cMuscleKeepOut node sets the local direction the cMuscleKeepOutDriven group moves when the collision happes. 

9 - Before we connect the collision mesh to the keep out nodes, lets set the In Direction values to avoid having our clusters jump to the wrong direction.
Select all the keep out nodes of the cluster handles on right side and set the In Direction X to -1 and the In Direction Y to -0.5. This way when the collision happens the cluster handle would move to the right twice as much as moving down.

10 - Select all the keep out nodes of the cluster handles on left side and set the In Direction X to 1 and the In Direction Y to -0.5.

11 - Select all the keep out node of the center cluster handle on the back of the collar and set the In Direction X to 0, In Direction Y to -0.5 and In Direction Z -1.

12 - To make the cMuscleKeepOut nodes collide with our collision head, select all the cluster handle groups and the collision head lastly and go to  Rigging>Deform>Muscle>Self/Multi Collsion>Connect Muscles to Keep Out.

13 - Now if you rotate the neck you should see the clusters moving the direction we set when colliding with the collision head.


The Joints Setup

Now we move to the final section of the rig which is adding the joints, attaching them to the collar curve and adding them to the jacket skin cluster. Depending on the mesh you have and your budget you can decide how many joints you can add. However, it is important to rmember this is not cloth simulation and there will be some areas in some animations that would require manual tweaking. Therefore we need to attach offset groups/ joints controllers to the curve instead of the joints themselves directly.

14 - Repeat the following steps the number of joints you would like to add to your setup. For this setup that will be 7 times:

  • Create a loctor at the origin and then group it.
  • Create a joint at the origin and then parent it to the locator.
  • Rename the joint to collar_01_jnt. Rename the locator to collar_01_loc and the group to collar_01_offest

PS: you can use any naming conventions you want, but for the sake of clarity I will refer to the locator group as the offset group.

This is the structure in the outliner:

15 -  In the NodeEditor create a pointOnCurveInfo node and check the Turn On Perecntage option in the attribute editor. Connect the collar curve shape worldSpace to the PointOnCurveInfo node inputCurve. Then connect the pointOnCurveInfo position to the locator offset group translate.

16 - Repeat the above step for every locator offset group.

17 - To place the locator offset groups and subsequently the joints we need to adjust the parameter value of every pointOnCurveInfo node we created. These are the values I used to place the offset groups like the following 0.00, 0.13, 0.3, 0.4, 0.6, 0.7, 0.87

18 - Finally, lets add the collar joints to the skin cluster by selecting all the collar joints and then the jacket mesh and go to Rigging>Skin>Edit Influences>Add Influence. Tweak the skinning so it is smooth but also test with animation to make sure the influences per joint is giving the desired result.


Final Result

If you rotate the neck joint/controller now you can see that the joints are following the curve and we still have the locator channels zeroed out for direct control over the joints. Happy Animating :)

Final notes: If you can only have very few joints lets say 4 or less, you can skip the whole curve setup and just rig the joints controllers as we did for the cluster groups insted.

Matching Transformation in Maya and MFnTransform pitfalls

I used to rely a lot on the MFnTransform class solely to match the transformation of one object to another and it has worked great for me (until recently).

In my own rigging system and the ones I built for my employers I never freeze transformations. I usually create an offset/buffer group and never mess with the object's pivot. I also never have multiple rotation offsets on top of my nodes (which actually complicate the process of matching transformations of one object to another with the MfnTransform like explained below)

However, now that I am dealing with all kind of rigs from different sources I can't force my aesthetic on them and instead I have to find a way that can work around all kind of the above issues to be able to wrap them to my rigging system.

The translation methods of the MFnTransform work great in all cases, especially that you can get the rotatePivot point in worldspace directly which is beneficial if you are dealing with objects that have frozen transformations. However, it is very prone to fail with objects that have -1 scale or with frozen transformation. That is when I realised I will have to rely more on MTransformationMatrix to decompose my target node matrix to guarantee the correct rotation values that I need to apply to my object to match.

Here is the code (With Maya API 2) I use to match transformations now and tested with every case and so far worked great. I will also comment out the previous methods I used to match the rotations with the MFnTransform class and when did they fail for me in case anyone is interested in testing for themselves.

import maya.api.OpenMaya as OpenMaya
def getMDagPath(node):
    selList=OpenMaya.MSelectionList()
    selList.add(node)
    return selList.getDagPath(0)
    
def getMObject(node):
    selList=OpenMaya.MSelectionList()
    selList.add(node)
    return selList.getDependNode(0)

def matchTranformation(targetNode, followerNode, translation=True, rotation=True):
    followerMTransform=OpenMaya.MFnTransform(getMDagPath(followerNode))
    targetMTransform=OpenMaya.MFnTransform(getMDagPath(targetNode))
    targetMTMatrix=OpenMaya.MTransformationMatrix(OpenMaya.MMatrix(cmds.xform(targetNode, matrix=True, ws=1, q=True)))
    if translation:
        targetRotatePivot=OpenMaya.MVector(targetMTransform.rotatePivot(OpenMaya.MSpace.kWorld))
        followerMTransform.setTranslation(targetRotatePivot,OpenMaya.MSpace.kWorld)
    if rotation:
        #using the target matrix decomposition
        #Worked on all cases tested
        followerMTransform.setRotation(targetMTMatrix.rotation(True),OpenMaya.MSpace.kWorld)
        
        #Using the MFnTransform quaternion rotation in world space
        #Doesn't work when there is a -1 scale on the object itself
        #Doesn't work when the object has frozen transformations and there is a -1 scale on a parent group.
        #followerMTransform.setRotation(MFntMainNode.rotation(OpenMaya.MSpace.kWorld, asQuaternion=True),OpenMaya.MSpace.kWorld)

So as you can see in the code, I still use the MFnTransform to match the translation of my object to the target's rotate pivot. Then I use the MTransformationMatrix to decompose the world Matrix of the target node so I can get the correct rotation no matter what rotation order, negative scale and whatever offsets in the target's hierarchy.

PS:Using Maya API doesn't support UNDO. If you want to be able to undo the snapping consider using the API to decompose and store information and use the maya.cmds xform command to move the object instead.

Space Switch Tool 1.0 for Maya

I think creating a space switch setup in Maya can be fairly easy if you know how to code. However, editing and debugging the setup can be complicated and needs a management system to handle the data.

I made this tool so it is both animator and riggers friendly. The UI is pretty interactive and the requirements for creating the setup are minimal. When adding a new space the tool guides the user by loading the previous made setup info to the tool.
The Marking menu provides a fast way to switch between spaces and executes a script to maintain the objects transformation when switching between spaces.
In the Edit and Debug tab you can view all the driver spaces and also edit their order and display names. You can even remove any of them or the whole setup cleanly if you want with out worrying about leaving some connected nodes behind in the scene.

For full explanation please check the tool's documentation page. Here is a quick video that covers most of the tool's functionality.

What rigging tools do you need?

Hey guys, it been a while since I shared an update here.
I have been working on encapsulating some of my most used Modular functions that I use in my rigging pipeline and I believe that every rigger or an animator would need and sell it (for a reasonable price) on my cubebrush store.

I have already two modules prepared so far:

  1. A tool that would add stretch properties to an IK Handle joint chain. It doesn't just make the IK Handle stretchy but It would also allow for every joint in the chain to scale individually while the IK handle still evaluating properly. It would also create the common stretch lock feature.
  2. A space switching tool. A non destructive rigging tool, where you can always go back to the node and add more spaces on the fly.

Do you think you will find a use for these tools in your rigs? What are your favourite tools or modules that you like to use to create or enhance your rigs?

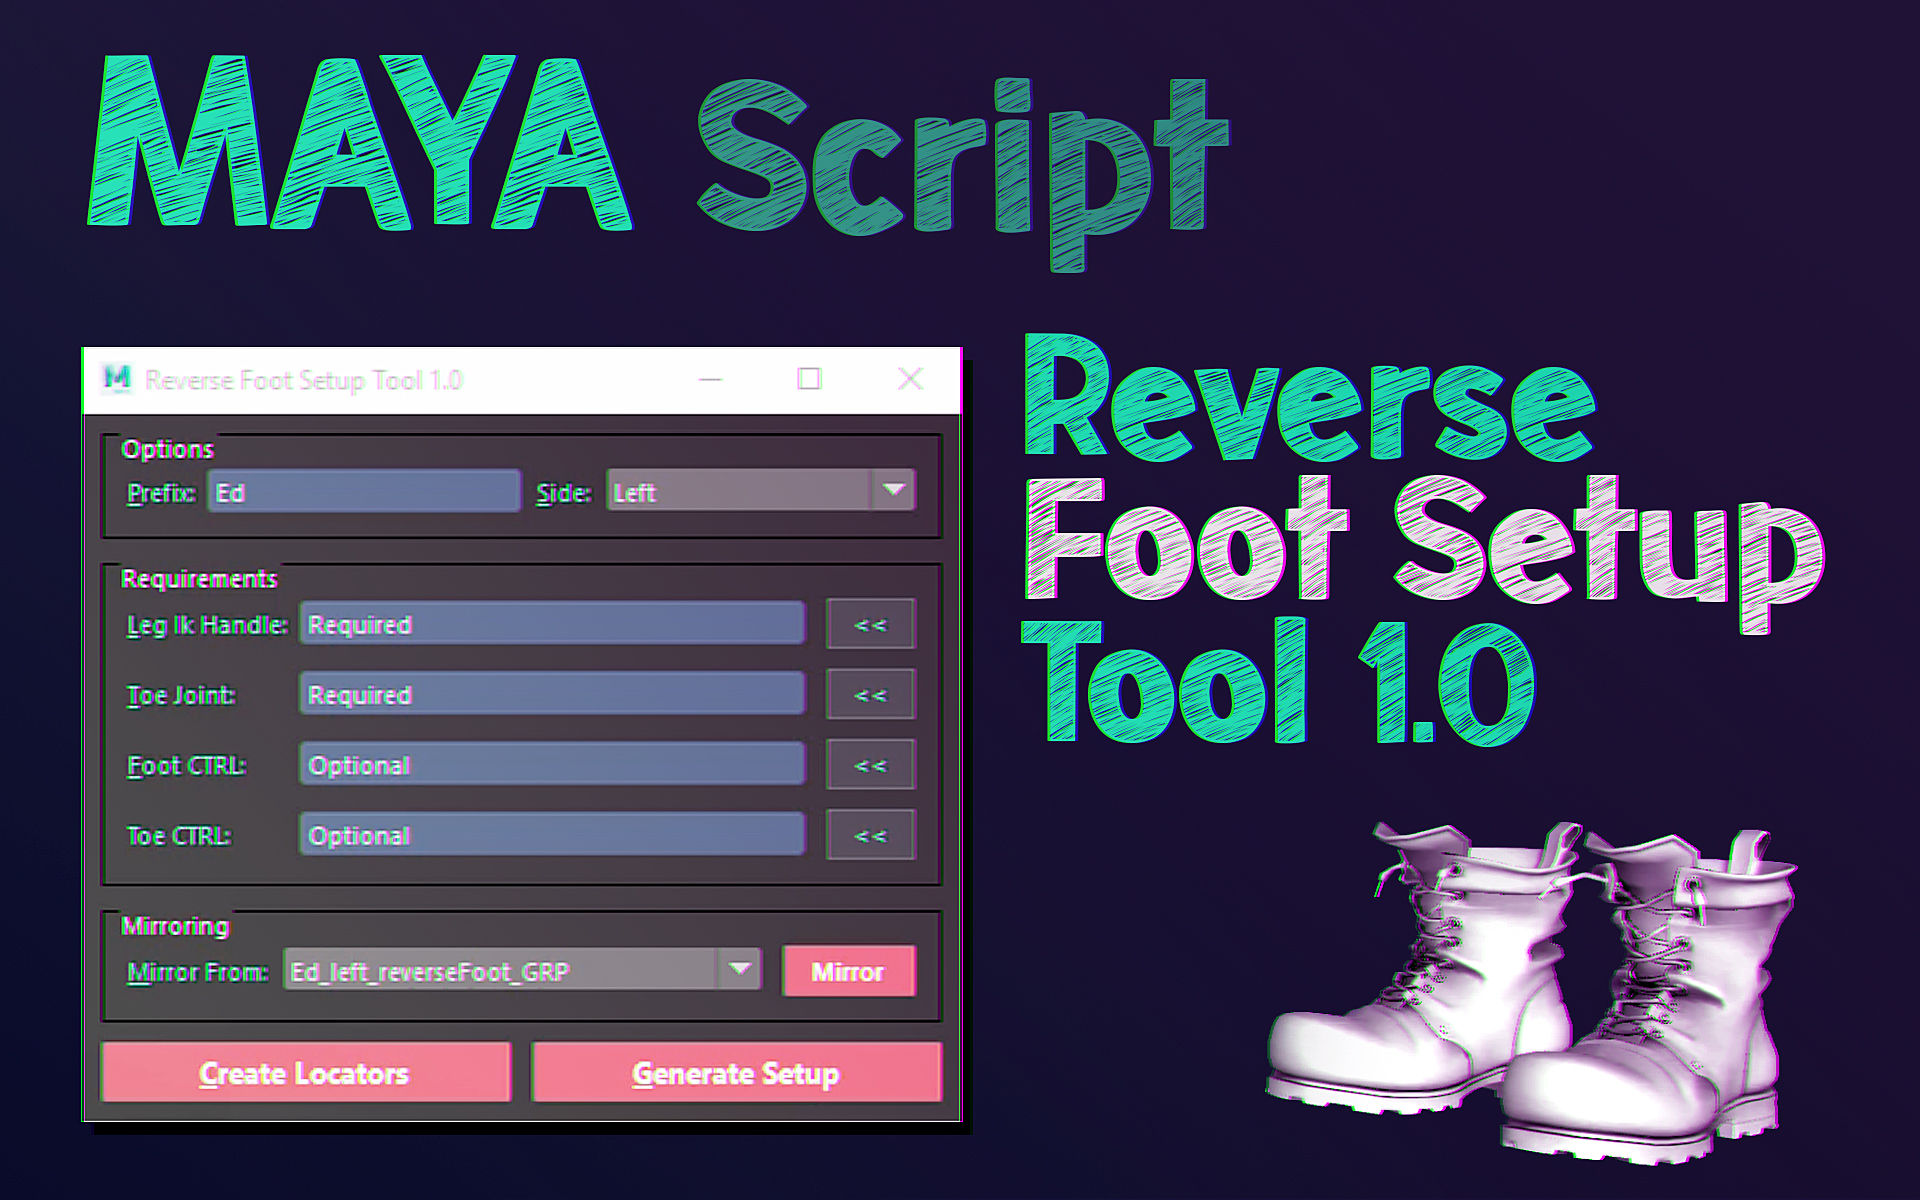
Reverse Foot Rig Tool 1.00 For Maya

Another Tool for Maya on cubebrush . I have been meaning to release this one for a while. Although it is very simple in concept this tool is very games setup and performance friendly since it doesn't alter your character skeleton and all its connections are done with Maya nodes(No expressions/No Set Driven Key Animations).  Also its ability to create a mirrored setup very fast is incredibly useful for mirroring animations.

For more info check the documentation

New Market place on Cubebrush

Hey guys, I am moving all of my tools to Cube brush.

You can find the Dynamic Chain setup tool for all Maya versions starting from 2014.

I am releasing the tool for free. However, I would appreciate some contribution if you would like me to keep making tools for free.

Keep posted. There will be more tools added to that page :)

Adding an Animated Gif to a QLabel with Pyside

Time for another tutorial  not for the drag and drop (Got a bit distracted with the inspiration for this tutorial) but for adding an animated gif to a QLabel.

In this example I am loading the file into a QByteArray so we don't keep that GIF in memory. However you can add the GIF file directly to the QMovie as the first argument.

If you can't display the GIF in your own code, double check the qt.conf file and make sure that it is referring to the correct plugins folder. 

PS: If you don't recognise the GIF shown in the tool, you can find the Video here.("You are welcome"). 

import sys
import os
from PySide import QtCore, QtGui
ImagesFolder=os.path.join(os.path.dirname(__file__),'images')

class CucumberGifWidget(QtGui.QLabel):
    def __init__(self, parent=None):
        super(CucumberGifWidget, self).__init__(parent)
        self.setAcceptDrops(True)
        self.setFrameStyle(QtGui.QFrame.WinPanel | QtGui.QFrame.Sunken)
        self.setAlignment(QtCore.Qt.AlignCenter)
        self.setSizePolicy(QtGui.QSizePolicy.MinimumExpanding, QtGui.QSizePolicy.MinimumExpanding)
        
        trashGif= open(os.path.join(ImagesFolder,'cucumber.gif'), 'rb').read()
        self.gifByteArray=QtCore.QByteArray(trashGif)
        self.gifBuffer=QtCore.QBuffer(self.gifByteArray)
        self.movie = QtGui.QMovie()
        self.movie.setFormat('GIF')
        self.movie.setDevice(self.gifBuffer)
        self.movie.setCacheMode(QtGui.QMovie.CacheAll)
        self.movie.setSpeed(100)
        self.setMovie(self.movie)
        self.movie.jumpToFrame(0)

    def dragEnterEvent(self, event):
        if event.mimeData().hasImage():
            event.setDropAction(QtCore.Qt.MoveAction)
            event.accept()
        else:
            event.ignore()

    def dropEvent(self, event):
        event.setDropAction(QtCore.Qt.MoveAction)
        if event.mimeData().hasImage():
            if "cucumber" in event.mimeData().text():
                self.movie.start()
                event.source().setParent(None)
                event.source().deleteLater()
            else:
                event.accept()
        else:
            event.ignore()

Drag and drop with Qt and PySide

I have always been using (well at least the past 7 years) QT for creating interfaces for my PySide/PyQt applications. Lately I've decided to dive a bit deeper to create and experiment with more complex behaviours. 

Starting with a convenient behaviour : Drag and Drop.

In the example I am sharing here I re-implemented the drag and drop related methods of a QLabel and a QWidget so we are able to drag the label into the widget. What actually happens is that when we drop the label on  the widget we create another Label with the same information,  it is a Copying action.

TODO: In the upcoming weeks we will add the functionality of re-arranging the labels in the Drop widget and also from one Drop widget to another.
import sys
from PySide import QtCore, QtGui

class InitialCard(QtGui.QLabel):
    def __init__(self, text, parent):
        super(InitialCard, self).__init__(text, parent)
        self.setAutoFillBackground(True)
        self.setFrameStyle(QtGui.QFrame.WinPanel|QtGui.QFrame.Sunken)
        newFont = QtGui.QFont("MsReferenceSansSerif", 10)
        newFont.setBold(False)
        self.setFont(newFont)
        self.setMinimumSize(90, 25)
        self.setMaximumHeight(30)
        self.setAlignment(QtCore.Qt.AlignCenter)
        self.mimeText=self.text()

    def mouseMoveEvent(self, event):
        if not self.text():
            return
        mimeData = QtCore.QMimeData()
        mimeData.setText(self.mimeText)
        drag = QtGui.QDrag(self)
        drag.setMimeData(mimeData)
        drag.exec_(QtCore.Qt.CopyAction | QtCore.Qt.MoveAction, QtCore.Qt.CopyAction)

class CardsDropWidget(QtGui.QWidget):

    def __init__(self, parent):
        super(CardsDropWidget, self).__init__(parent)
        self.setAcceptDrops(True)
        self.contentsVLO = QtGui.QVBoxLayout()
        self.contentsVLO.setAlignment(QtCore.Qt.AlignTop)
        self.setLayout(self.contentsVLO)
    
    def dragEnterEvent(self, event):
        if event.mimeData().hasText():
            event.setDropAction(QtCore.Qt.CopyAction)
            event.accept()
        else:
            event.ignore()

    def dropEvent(self, event):
        if event.mimeData().hasText():
            cardSource=event.source()
            cardText=cardSource.text()
            if not cardSource in self.children():
                newCard = InitialCard(cardText, self)
                self.contentsVLO.addWidget(newCard)
                cardSource.clear()
            else:
                event.ignore()
        else:
            event.ignore()

class MainDialogue(QtGui.QDialog):
    def __init__(self, parent=None):
        super(MainDialogue, self).__init__(parent)
        self.label=InitialCard("initial", self)
        self.lineEdit=QtGui.QLineEdit("Create a Card Here!!")
        self.lineEdit.selectAll()
        self.scrollArea = QtGui.QScrollArea()
        self.scrollArea.setWidgetResizable(True)
        self.scrollContent = CardsDropWidget(self.scrollArea)
        self.scrollArea.setMinimumWidth(150)
        self.scrollArea.setWidget(self.scrollContent)
        self.dialogueLayout=QtGui.QHBoxLayout()
        self.labelLayout=QtGui.QVBoxLayout()
        self.labelLayout.addWidget(self.label)
        self.labelLayout.addWidget(self.lineEdit)
        self.labelLayout.addStretch()
        self.dialogueLayout.addWidget(self.scrollArea)
        self.dialogueLayout.addLayout(self.labelLayout)
        self.setLayout(self.dialogueLayout)
        self.setWindowTitle("Drag and Drop")
        self.setMinimumSize(300, 150)
        self.lineEdit.returnPressed.connect(self.createCardTxt_fn)
        
    def createCardTxt_fn(self):
        cardTxt=unicode(self.lineEdit.text())
        self.label.setText(cardTxt)

if __name__ == '__main__':
    app = QtGui.QApplication(sys.argv)
    window = MainDialogue()
    window.show()
    sys.exit(app.exec_())

Battlefield 1!!

Hej Hej, its been a while since I posted here. Its been a very busy year. Moved to another country and joined a new company. Yes Dice EA and I am so excited to share with you the project that I have been working on over there, BattleField 1.

DynamicChainSetupTool is HERE

Happy New Year , I've finally finished the DynamicChainSetupTool I promised :)


DOWNLOAD HERE (Cubebrush link)

Maya versions: 2014 - 2018

Place the dynamcChainSetupTool folder in your scripts folder. Run these lines in a python tab in the script editor:

from dynamicChainSetupTool import dynamicChainSetup as dc
dc.show()


The tool is a simpler version of the tool I wrote for Crytek and showed in my demo reel.

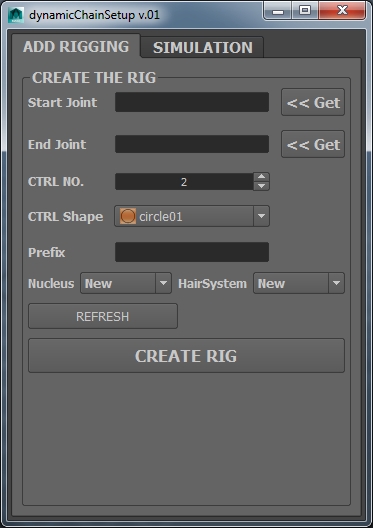
In the Add Rigging tab you can build the rig with your choice of no. of controllers and a controller shape.

You can also give the rig a prefix, if you don't give it a prefix it will take the name of the start joint as a prefix.

In the nucleus and the hair system drop down menus, you will see a list of all nuclei and hair systems in the scene in case you want to use any of them for your rig.

If you create manually new nucleus or hair system while the tool is open just click refresh to add them to the drop down menus in the UI.

Now you are ready to create the rig, it is a very simple IK behaving like Fk setup. Remember you need ti keep the dynamic curve smooth for best simulation results.

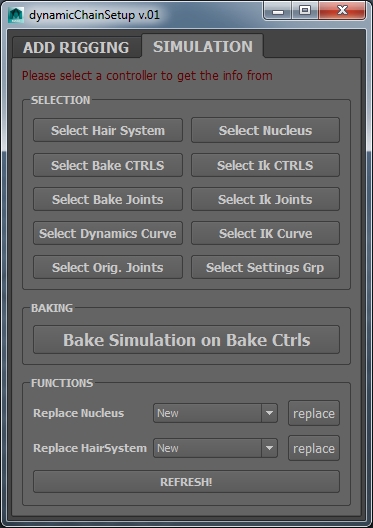
In the Simulation tab, just make sure you have a controller selected and get the nodes that you like.

I don't know about y'all but the times Maya crashed on me trying to walk the attribute editor to select the hair system made me REALLY appreciate this tool.. this is honestly my favorite part about the whole thing.

Another functionality is the baking rig, there you can bake the dynamics simulation onto controllers. Then you have that simulation as animation curves.

This will allow you to fix some collision problems, add another animation layer or make the animation loop-able for a game animation.
All of this without breaking the dynamics rig, which would happen if you bake results on the joints.

In the functions section you can assign an existing or new hair system or nucleus to you rig. 

I hope you enjoy the tool, I will really appreciate if you let me know how it works for you. If you have any questions or problems using it, feel free to post here. Thanks!
 

Ik Spline Advanced Twist Controls - Tutorial

Hello everyone,

I thought I would share some info on the Ik Spline Advanced Twist Controls since I found a few questions about it online and also our new riggers were kind of confused about it 

There are many ways to setup the twist along a spline IK joint chain.. Based on the character you are rigging you can choose what is best for you.

This tutorial assumes you are already familiar with the spline Ik setup and will be focusing only on the advanced twist settings.

First of all, if your aim axis along the joint chain...


Read More

Blizzard Loots

While at GDC I attended the Blizzard party along with my colleagues at Crytek.
It was such a great party, met lots of awesome people over there. And as a huge fan of Diablo3 they handled my non stop questioning about the “Reaper of souls” release date for PS3 without  actually giving an answer :(
After giving up on getting an answer, I had a chance to challenge my boss (Chris Evans) at a game of HEARTHSTONE, miraculously I won and got out of the party with these goodies :) woahahhah

GDC 2014: Technical Artist Bootcamp

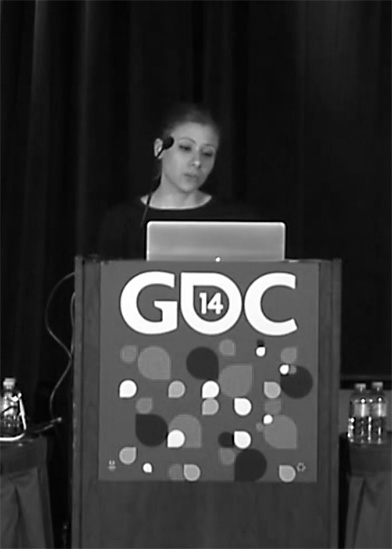
I’ll be giving a presentation at GDC2014 together with the awesome Vlad Mastilovic from 3lateral. You can DOWNLOAD IT HERE
He’ll be talking about the Ryse facial rigs and I’ll be talking about the character rigging on Ryse.

Technical art continues to march forward and at a faster pace than most disciplines, as it is wide-reaching and wide open. Rigging, Python, pipelines, shaders and unit tests are all known and understood at this time. It’s time to push forward and stretch our legs. Large studios need more powerful toolchains with more professional development environments and small teams need each and every member to be very technically capable. Technical artists know efficiency is at a premium, and a working tool is not good enough anymore; tech artists will learn to focus on a quality user experience when designing tools and workflows. Tech animators will learn quick prototyping techniques of animation systems, which has traditionally been one of the most complex areas to author. More techniques for automating asset processing, fast cinematic workflows, and optimizing asset performance for run-time will be covered.
— GDC